Linux 内核数据结构
获得源码
目前,Linux 内核的源码维护在 GitHub 上,地址为:https://github.com/torvalds/linux
- 克隆到本地
git clone https://github.com/torvalds/linux
- 本书使用的源码版本为 2.6.34 ,所以切换到对应 Tag:
cd linux
git checkout v2.6.34
或者直接在:https://github.com/torvalds/linux/releases/tag/v2.6.34 下载
Linux 源码树根目录说明
$ tree -L 1
.
├── arch       # 特定体系结构的源码
├── block      # 块设备 I/O 层
├── COPYING     # 内核许可证(GNU GPL v2)
├── CREDITS     # 内核代码开发者列表
├── crypto      # 加密 API
├── Documentation  # 内核源码文档
├── drivers     # 设备驱动程序
├── firmware     # 使用某些驱动程序而需要的设备固件
├── fs        # VFS 和各种文件系统
├── include     # 内核头文件
├── init       # 内核引导和初始化
├── ipc       # 进程间通信代码
├── Kbuild      # 用于编译Linux内核文件,对makefile进行了扩充
├── kernel      # 像调度程序这样的核心子系统
├── lib       # 通用内核函数
├── MAINTAINERS   # 维护者列表以及如何提交内核更改的说明文件
├── Makefile     # makefile
├── mm        # 内存管理子系统和vm
├── net       # 网络子系统
├── README      # README
├── REPORTING-BUGS  # Linux内核常见问题解答
├── samples     # 示例
├── scripts     # 编译内核所用的脚本
├── security     # Linux安全模块
├── sound      # 语音子系统
├── tools      # 在Linux开发中有用的工具
├── usr       # 早期用户空间代码(所谓的 inittranfs)
└── virt       # 虚拟化基础结构
21 directories, 7 files
内核数据结构简介
介绍通用数据结构中最有用的几个:
链表
include/linux/list.h
简单定义
 1
 2
 3
 4
 5
 6
 7
 8
 9
10
11
12
13
|
// 单向链表
struct list_element
{
  void *data;
  struct list_element *next; *// 指向下一个*
};
// 双向链表
struct list_element
{
  void *data;
  struct list_element *next; *// 指向下一个*
  struct list_element *prev; *// 指向前一个*
};
|
环形链表即把链表的尾元素的下一个元素变为链表的头部。
kernel中的链表
-
kernel中对链表的定义在:include/linux/list.h 下。
-
由于双向链表有比较强大的灵活性,所以linux中的链表采用环形双向链表来完成。
-
Linux与传统的方式与众不同,它不是将数据结构塞入链表,而是把链表节点塞入数据结构。

节点定义
链表节点定义为:
1
2
3
4
|
// include/linux/list.h  19
struct list_head {
  struct list_head *next, *prev;
};
|
节点本身并没有意义,它需要被嵌入自己的数据结构中才能生效,链表需要在使用前进行初始化,因为多数元素是动态创建的。
1
2
|
// include/linux/list.h  23行
#define LIST_HEAD_INIT(*name*) { &(name), &(name) }
|
看起比较简单,那如何使用这个链表节点呢,书中提供了一个例子:
1
2
3
4
5
6
7
|
struct fox
{
  unsigned long tail_length;
  unsigned long weight;
  bool is_fantastic;
  struct list_head list; *// 所有 fox 结构形成链表*
};
|
container_of 宏
介绍
原型定义如下:
include/linux/kernel.h 709行
1
2
3
|
#define container_of(*ptr*, *type*, *member*) ({      \
  const typeof( ((type *)0)->member ) *__mptr = (ptr);   \ // 1
  (type *)( (char *)__mptr - offsetof(type,member) );})   // 2
|
其中 offsetof 的定义为:
include/linux/stddef.h 24行
1
|
#define offsetof(*TYPE*, *MEMBER*) ((size_t) &((TYPE *)0)->MEMBER)
|
其中:
在链表结构中,使用了一个 list_entry 的宏,为:
1
2
|
#define list_entry(*ptr*, *type*, *member*) \
  container_of(ptr, type, member)
|
实质上就是调用了一下 container_of
功能及使用方法
功能:通过成员变量的地址得到它所在结构的首地址
参数:
-
type 需要操作的数据类型
-
member type结构的成员名称
-
ptr member类型定义的指针变量
使用方法例如:
 1
 2
 3
 4
 5
 6
 7
 8
 9
10
11
12
13
14
15
16
17
18
19
20
21
22
|
#include <stdio.h>
#define container_of(*ptr*, *type*, *member*) ({      \
  const typeof( ((type *)0)->member ) *__mptr = (ptr);   \
  (type *)( (char *)__mptr - offsetof(type,member) ); })
#define offsetof(*TYPE*, *MEMBER*) ((size_t) & ((TYPE *)0)->MEMBER)
struct typeabc
{
  int mem0;
  float mem2;
  double mem4;
  char mem6;
};
int main()
{
  struct typeabc abc, *pabc;
  abc.mem2 = 0.0;
  float *pmem2 = &abc.mem2;
  *//通过成员变量的地址得到它所在结构的首地址*
  pabc = container_of(pmem2, struct typeabc, mem2);
  printf("%p\n", pabc);
  return 0;
}
|
放在内核中,使用 container_of 可以方便的从链表指针找到其父结构中包含的任何变量,因为在C语言中,一个给定结构的变量偏移在编译的时候地址就被固定了下来。
链表操作
所有操作的复杂度都是 O(1)
插入节点
内核提供了一组链表操作流程,使用 list_add() 方法加入一个新节点到链表中:
从以下代码中可以看出,插入一个新节点时,是把新节点插入到了头结点和其下一个点的中间。
 1
 2
 3
 4
 5
 6
 7
 8
 9
10
11
12
13
14
15
16
17
18
19
20
21
22
23
24
25
26
27
28
29
30
31
32
33
34
|
// include/linux/list.h  34行
*/**
 ** Insert a* *new* *entry between two known consecutive entries.*
 ***
 ** This is only* *for* *internal* *list* *manipulation where we know*
 ** the prev/next entries already!*
 **/*
#ifndef CONFIG_DEBUG_LIST
static inline void __list_add(struct list_head *new,
         struct list_head **prev*,
         struct list_head **next*)
{
  next->prev = new;
  new->next = next;
  new->prev = prev;
  prev->next = new;
}
#else
extern void __list_add(struct list_head *new,
         struct list_head **prev*,
         struct list_head **next*);
#endif
*/***
 ** list_add - add a* *new* *entry*
 ** @**new**:* *new* *entry to be added*
 ** @head:* *list* *head to add it after*
 ***
 ** Insert a* *new* *entry after the specified head.*
 ** This is good* *for* *implementing stacks.*
 **/*
static inline void list_add(struct list_head *new, struct list_head **head*)
{
  __list_add(new, head, head->next);
}
|
插入到链表尾部:
实质上是调用了 __list_add() 方法。把元素插在了投机前的前一个到头结点中间
include/linux/list.h 70行
 1
 2
 3
 4
 5
 6
 7
 8
 9
10
11
12
|
*/***
 ** list_add_tail - add a* *new* *entry*
 ** @**new**:* *new* *entry to be added*
 ** @head:* *list* *head to add it before*
 ***
 ** Insert a* *new* *entry before the specified head.*
 ** This is useful* *for* *implementing queues.*
 **/*
static inline void list_add_tail(struct list_head *new, struct list_head **head*)
{
  __list_add(new, head->prev, head);
}
|
删除节点
代码很容易看懂
include/linux/list.h 83行
 1
 2
 3
 4
 5
 6
 7
 8
 9
10
11
12
13
14
15
16
17
18
19
20
21
22
23
24
25
26
27
28
|
*/**
 ** Delete a* *list* *entry by making the prev/next entries*
 ** point to each other.*
 ***
 ** This is only* *for* *internal* *list* *manipulation where we know*
 ** the prev/next entries already!*
 **/*
static inline void __list_del(struct list_head * *prev*, struct list_head * *next*)
{
  next->prev = prev;
  prev->next = next;
}
*/***
 ** list_del - deletes entry from* *list**.*
 ** @entry: the element to* *delete* *from the* *list**.*
 ** Note: list_empty() on entry does* *not* *return* *true* *after* *this**, the entry is*
 ** in an undefined state.*
 **/*
#ifndef CONFIG_DEBUG_LIST
static inline void list_del(struct list_head **entry*)
{
  __list_del(entry->prev, entry->next);
  entry->next = LIST_POISON1;
  entry->prev = LIST_POISON2;
}
#else
extern void list_del(struct list_head **entry*);
#endif
|
include/linux/list.h 136行 从链表中删除一个节点,并对其重新初始化
*/***
 ** list_del_init - deletes entry from* *list* *and* *reinitialize it.*
 ** @entry: the element to* *delete* *from the* *list**.*
 **/*
static inline void list_del_init(struct list_head **entry*)
{
  __list_del(entry->prev, entry->next);
  INIT_LIST_HEAD(entry);
}
// 重新初始化的方法,把下一个和前一个节点变成自己
static inline void INIT_LIST_HEAD(struct list_head **list*)
{
  list->next = list;
  list->prev = list;
}
移动和合并节点
直接把要移动的节点这一段的头尾给接起来,然后再插入到新的地方
移动节点 90行
 1
 2
 3
 4
 5
 6
 7
 8
 9
10
|
*/***
 ** list_move - delete from one* *list* *and* *add* *as* *another**'s head*
 ** @**list**: the entry to move*
 ** @head: the head that will precede our entry*
 **/*
static inline void list_move(struct list_head **list*, struct list_head **head*)
{
  __list_del(list->prev, list->next);
  list_add(list, head);
}
|
合并节点 271行
 1
 2
 3
 4
 5
 6
 7
 8
 9
10
11
12
13
14
15
16
17
18
19
20
21
22
|
static inline void __list_splice(const struct list_head **list*,
         struct list_head **prev*,
         struct list_head **next*)
{
  struct list_head *first = list->next;
  struct list_head *last = list->prev;
  first->prev = prev;
  prev->next = first;
  last->next = next;
  next->prev = last;
}
*/***
 ** list_splice - join two lists, this is designed* *for* *stacks*
 ** @**list**: the* *new* *list* *to add.*
 ** @head: the place to add it in the first* *list**.*
 **/*
static inline void list_splice(const struct list_head **list*,
        struct list_head **head*)
{
  if (!list_empty(list))
    __list_splice(list, head, head->next);
}
|
遍历链表
正向遍历
include/linux/list.h 367行
1
2
3
4
5
6
7
8
|
*/***
 ** list_for_each   -  iterate over a* *list*
 ** @pos:   the &struct list_head to* *use* *as* *a* *loop* *cursor**.*
 ** @head:  the head* *for* *your* *list**.*
 **/*
#define list_for_each(*pos*, *head*) \
  for (pos = (head)->next; prefetch(pos->next), pos != (head); \
      pos = pos->next)
|
其中,使用了 prefetch() 宏,其功能是数据的预先读取。当你确认后继续要读取某内存的信息的时候,可以采用prefetch将这一块数据读 取到cache之中,以便后继快速访问。
利用上面提到的 list_entry() ,可以实现优美的遍历,把当前链表节点所在的结构体的结构地址拿出来。
418行
 1
 2
 3
 4
 5
 6
 7
 8
 9
10
|
*/***
 ** list_for_each_entry  -  iterate over* *list* *of given type*
 ** @pos:   the type \* to* *use* *as* *a* *loop* *cursor**.*
 ** @head:  the head* *for* *your* *list**.*
 ** @member: the name of the list_struct within the struct.*
 **/*
#define list_for_each_entry(*pos*, *head*, *member*)        \
  for (pos = list_entry((head)->next, typeof(*pos), member);  \
     &pos->member != (head);   \
     pos = list_entry(pos->member.next, typeof(*pos), member))
|
可以看一个实际的例子:
fs/notify/inotify/inotify.c 213行
 1
 2
 3
 4
 5
 6
 7
 8
 9
10
11
12
13
14
15
16
|
*/**
 ** inotify_find_handle - find the watch associated with the given inode* *and*
 ** handle*
 ***
 ** Callers must hold inode->inotify_mutex.*
 **/*
static struct inotify_watch *inode_find_handle(struct inode **inode*,
              struct inotify_handle **ih*)
{
  struct inotify_watch *watch;
  list_for_each_entry(watch, &inode->inotify_watches, i_list) {
    if (watch->ih == ih)
      return watch;
  }
  return NULL;
}
|
这是linux中内核文件系统的更新通知机制,函数遍历了 inode->inotify_watchs中的所有项
反向遍历
 1
 2
 3
 4
 5
 6
 7
 8
 9
10
11
|
// 425行
*/***
 ** list_for_each_entry_reverse - iterate backwards over* *list* *of given type.*
 ** @pos:   the type \* to* *use* *as* *a* *loop* *cursor**.*
 ** @head:  the head* *for* *your* *list**.*
 ** @member: the name of the list_struct within the struct.*
 **/*
#define list_for_each_entry_reverse(*pos*, *head*, *member*)      \
  for (pos = list_entry((head)->prev, typeof(*pos), member);  \
     prefetch(pos->member.prev), &pos->member != (head);   \
     pos = list_entry(pos->member.prev, typeof(*pos), member))
|
和上面一样,无非是沿着前驱遍历。
遍历同时删除
 1
 2
 3
 4
 5
 6
 7
 8
 9
10
11
12
13
|
// 487行
*/***
 ** list_for_each_entry_safe - iterate over* *list* *of given type safe against removal of* *list* *entry*
 ** @pos:   the type \* to* *use* *as* *a* *loop* *cursor**.*
 ** @n:    another type \* to* *use* *as* *temporary* *storage*
 ** @head:  the head* *for* *your* *list**.*
 ** @member: the name of the list_struct within the struct.*
 **/*
#define list_for_each_entry_safe(*pos*, *n*, *head*, *member*)      \
  for (pos = list_entry((head)->next, typeof(*pos), member),  \
    n = list_entry(pos->member.next, typeof(*pos), member); \
     &pos->member != (head);           \
     pos = n, n = list_entry(n->member.next, typeof(*n), member))
|
删除的原理是,在删除之前存储 next 指针到一个临时变量,以便能执行删除操作。
比如在 fs/notify/inotify/inotify.c 452行中:
 1
 2
 3
 4
 5
 6
 7
 8
 9
10
11
12
13
14
15
16
|
*/***
 ** inotify_inode_is_dead - an inode has been deleted, cleanup any watches*
 ** @inode: inode that is about to be removed*
 **/*
void inotify_inode_is_dead(struct inode **inode*)
{
  struct inotify_watch *watch, *next;
  mutex_lock(&inode->inotify_mutex);
  list_for_each_entry_safe(watch, next, &inode->inotify_watches, i_list) {
    struct inotify_handle *ih = watch->ih;
    mutex_lock(&ih->mutex);
    inotify_remove_watch_locked(ih, watch);
    mutex_unlock(&ih->mutex);
  }
  mutex_unlock(&inode->inotify_mutex);
}
|
此函数遍历 inotify_watches 链表中所有项
其余链表还有很多操作,都可以在该头文件中找到。
队列
操作系统的编程模型有生产者和消费者,生产者生产数据,消费者消费数据,需要一个队列来当中间人。
原理无非是先入先出(FIFO)。

Linux内核中的队实现在 kernel/kfifo.c 中,而声明在 include/linux/kfifo.h 中。
Kfifo
include/linux/kfifo.h 47行
1
2
3
4
5
6
|
struct kfifo {
  unsigned char *buffer;  */\* the buffer holding the data \*/*
  unsigned int size;  */\* the size of the allocated buffer \*/*
  unsigned int in;   */\* data is added at offset (in % size) \*/*
  unsigned int out;  */\* data is extracted from off. (out % size) \*/*
};
|
Linux的kfifo提供了两个操作:
kfifo对象维护了两个对象:
-
入口偏移量:下一次入队列时候的位置
-
出口偏移量:下一次出队列时的位置
出口偏移量总是小于入口偏移量,否则无意义,因为那样说明要出队列的元素根本还没有入队列
-
入队是拷贝数据到队列的入口偏移量。之后入口偏移量增加推入的元素数目。
-
出队操作是从队列的出口偏移量处拷贝数据。之后出口偏移量减去摘取元素的数目。
-
In == out 时说明队列空了,在新的数据被推入前,不可以在摘取任何数据了。
-
入口偏移量等于队列长度时,说明在队列 resize 前,不可以再加入新数据
创建队列
kernel/kfifo.c 56行
 1
 2
 3
 4
 5
 6
 7
 8
 9
10
11
12
13
14
15
16
17
18
19
20
21
22
23
24
25
26
27
28
29
30
31
|
*/***
 ** kfifo_alloc - allocates a* *new* *FIFO internal buffer*
 ** @fifo: the fifo to assign then* *new* *buffer*
 ** @size: the size of the buffer to be allocated,* *this* *have to be a power of* *2.*
 ** @gfp_mask: get_free_pages mask,* *passed to* *kmalloc**()*
 ***
 ** This function dynamically allocates a* *new* *fifo internal buffer*
 ***
 ** The size will be rounded-up to a power of* *2.*
 *** *The buffer will be release with* *kfifo_free**()**.*
 ** Return* *0* *if* *no error, otherwise the an error code*
 **/*
int kfifo_alloc(struct kfifo **fifo*, unsigned int *size*, gfp_t *gfp_mask*)
{
  unsigned char *buffer;
  */**
   ** round up to the next power of* *2**, since our* *'let the indices*
   ** wrap' technique works only in* *this* *case**.*
   **/*
  if (!is_power_of_2(size)) {
    BUG_ON(size > 0x80000000);
    size = roundup_pow_of_two(size);
  }
  buffer = kmalloc(size, gfp_mask);
  if (!buffer) {
    _kfifo_init(fifo, NULL, 0);
    return -ENOMEM;
  }
  _kfifo_init(fifo, buffer, size);
  return 0;
}
|
-
此函数初始化了一个大小为 size 的kfifo
-
使用 gfp_mask 标识分配队列
-
如果成功会返回0,如果错误会返回一个错误码。
-
size必须是2的次幂
kfifo的size是2^n。所以当in > 2^n的时候,(in & 2^n - 1) == (in % 2^n),所以这里可以用与操作替代求余来获取in在队列中实际的位置。
其中
kernel/kfifo.c 31行
1
2
3
4
5
6
7
|
static void _kfifo_init(struct kfifo **fifo*, void **buffer*,
    unsigned int *size*)
{
  fifo->buffer = buffer;
  fifo->size = size;
  kfifo_reset(fifo);
}
|
- 此函数创建并初始化一个 kfifo 对象,使用 buffer指向的 size 字节大小的内存。
静态声明方法:
include/linux/kfifo.h 67行
 1
 2
 3
 4
 5
 6
 7
 8
 9
10
11
12
13
14
15
|
*/***
 ** DECLARE_KFIFO - macro to* *declare* *a kfifo* *and* *the associated buffer*
 ** @name: name of the declared kfifo datatype*
 ** @size: size of the fifo buffer. Must be a power of two.*
 ***
 ** Note1: the macro can be used inside struct* *or* *union declaration*
 ** Note2: the macro creates two objects:*
 **  A kfifo object with the given name* *and* *a buffer* *for* *the kfifo*
 **  object named name**##kfifo_buffer*
 **/*
#define DECLARE_KFIFO(*name*, *size*) \
union { \
  struct kfifo name; \
  unsigned char name##kfifo_buffer[size + sizeof(struct kfifo)]; \
}
|
和
include/linux/kfifo.h 83行
1
2
3
4
5
6
7
8
|
*/***
 ** INIT_KFIFO - Initialize a kfifo declared by DECLARE_KFIFO*
 ** @name: name of the declared kfifo datatype*
 **/*
#define INIT_KFIFO(*name*) \
  name = __kfifo_initializer(sizeof(name##kfifo_buffer) - \
        sizeof(struct kfifo), \
        name##kfifo_buffer + sizeof(struct kfifo))
|
- 上面两个方法会创建一个名为 name ,大小为 size 的 kfifo 对象,和前面一样,size 必须是2的幂。
入队操作
kernel/kfifo.c 240行
 1
 2
 3
 4
 5
 6
 7
 8
 9
10
11
12
13
14
15
16
17
18
19
20
21
|
*/***
 ** kfifo_in - puts some data into the FIFO*
 ** @fifo: the fifo to be used.*
 ** @from: the data to be added.*
 ** @**len**: the length of the data to be added.*
 ***
 ** This function copies at most @**len* *bytes from the @from buffer into*
 ** the FIFO depending on the free space, and returns the number of*
 ** bytes copied.*
 ***
 ** Note that with only one concurrent reader and one concurrent*
 ** writer, you don**'t need extra locking to use these functions.*
 **/*
unsigned int kfifo_in(struct kfifo **fifo*, const void **from*,
        unsigned int *len*)
{
  len = min(kfifo_avail(fifo), len);
  __kfifo_in_data(fifo, from, len, 0);
  __kfifo_add_in(fifo, len);
  return len;
}
|
从 kernel/kfifo.c 119行
 1
 2
 3
 4
 5
 6
 7
 8
 9
10
11
12
13
14
15
16
|
static inline void __kfifo_in_data(struct kfifo **fifo*,
    const void **from*, unsigned int *len*, unsigned int *off*)
{
  unsigned int l;
  */**
   ** Ensure that we sample the fifo->out index -before- we*
   ** start putting bytes into the kfifo.*
   **/*
  smp_mb();
  off = __kfifo_off(fifo, fifo->in + off);
  */\* first put the data starting from fifo->in to buffer end \*/*
  l = min(len, fifo->size - off);
  memcpy(fifo->buffer + off, from, l);
  */\* then put the rest (if any) at the beginning of the buffer \*/*
  memcpy(fifo->buffer, from + l, len - l);
}
|
可以看出,拷贝数据的时候使用的是函数 memcpy
出队操作
kernel/kfifo.c 283行
 1
 2
 3
 4
 5
 6
 7
 8
 9
10
11
12
13
14
15
16
17
18
19
|
*/***
 ** kfifo_out - gets some data from the FIFO*
 ** @fifo: the fifo to be used.*
 ** @to: where the data must be copied.*
 ** @**len**: the size of the destination buffer.*
 ***
 ** This function copies at most @**len* *bytes from the FIFO into the*
 ** @to buffer and returns the number of copied bytes.*
 ***
 ** Note that with only one concurrent reader and one concurrent*
 ** writer, you don**'t need extra locking to use these functions.*
 **/*
unsigned int kfifo_out(struct kfifo **fifo*, void **to*, unsigned int *len*)
{
  len = min(kfifo_len(fifo), len);
  __kfifo_out_data(fifo, to, len, 0);
  __kfifo_add_out(fifo, len);
  return len;
}
|
- 该函数从 fifo 指向的队列中拷贝出长度为len的字节到to所指的缓冲中。如果成功,则返回拷贝数据的长度。如果队列中数据大小小于len,则该函数拷贝出的数据必然小于需要的数据大小
当数据被摘取后,数据就会被删除掉,如果只是想看一下队列的数据,而不像被删除,可以使用 kernel/kfifo.c 306行
 1
 2
 3
 4
 5
 6
 7
 8
 9
10
11
12
13
14
15
16
17
18
|
*/***
 ** kfifo_out_peek - copy some data from the FIFO, but* *do* *not remove it*
 *** *@fifo**: the fifo to be used.*
 *** *@to**: where the data must be copied.*
 *** *@len**: the size of the destination buffer.*
 *** *@offset**: offset into the fifo*
 ***
 ** This function copies at most* *@len* *bytes at* *@offset* *from the FIFO*
 ** into the* *@to* *buffer and returns the number of copied bytes.*
 ** The data is not removed from the FIFO.*
 **/*
unsigned int kfifo_out_peek(struct kfifo **fifo*, void **to*, unsigned int *len*,
        unsigned *offset*)
{
  len = min(kfifo_len(fifo), len + offset);
  __kfifo_out_data(fifo, to, len, offset);
  return len;
}
|
进行只读数据。
获取队列长度
include/linux/kfifo.h 148行
1
2
3
4
5
6
7
8
|
*/***
 ** kfifo_size - returns the size of the fifo in bytes*
 ** @fifo: the fifo to be used.*
 **/*
static inline __must_check unsigned int kfifo_size(struct kfifo *fifo)
{
  return fifo->size;
}
|
- 此函数获得存储 kfifo 队列的总体空间大小(字节为单位)
include/linux/kfifo.h 157行
 1
 2
 3
 4
 5
 6
 7
 8
 9
10
11
|
*/***
 ** kfifo_len - returns the number of used bytes in the FIFO*
 ** @fifo: the fifo to be used.*
 **/*
static inline unsigned int kfifo_len(struct kfifo **fifo*)
{
  register unsigned int  out;
  out = fifo->out;
  smp_rmb();
  return fifo->in - out;
}
|
- 此函数表示当前队列中的元素数量,从源码可以看出来,是做了一次减法运算。
重置和撤销队列
重置队列:include/linux/kfifo.h 129行
1
2
3
4
5
6
7
8
|
*/***
 ** kfifo_reset - removes the entire FIFO contents*
 ** @fifo: the fifo to be emptied.*
 **/*
static inline void kfifo_reset(struct kfifo **fifo*)
{
  fifo->in = fifo->out = 0;
}
|
从源码可以看出,实质上是直接把入口和出口偏移量变成了0
撤销队列:kernel/kfifo.c 93行
1
2
3
4
5
6
7
8
9
|
*/***
 ** kfifo_free - frees the FIFO internal buffer*
 ** @fifo: the fifo to be freed.*
 **/*
void kfifo_free(struct kfifo **fifo*)
{
  kfree(fifo->buffer);
  _kfifo_init(fifo, NULL, 0);
}
|
从源码可以看出,首先调用了 kfee 释放了内存,然后初始化了一个 NULL 的kfifo对象
映射
映射就是我们常见的 k-v 键值对。是由唯一键组成的集合,而每个键必然关联一个特定的值。这种键到值的关系称为映射,映射至少要支持三个操作:
-
ADD(k,v)
-
Remove(key)
-
Value = Lookup (key)
Linux 内核提供了简单的、有效的映射数据结构。但是他并非是一个通用的映射,他的目标是:映射一个唯一的标识数(UID)到一个指针
数据结构选型
我们知道,散列表(Hash)也是一种常用的实现 k,v 的方法,为什么在 linux 中选用了红黑树呢?
-
用散列表需要设定具体大小和散列函数,而红黑树优雅的扩展存储任意键
-
散列表如果遇到哈希冲突,那么最坏的时间复杂度是 O(n),而红黑树最坏情况下是 O(logn),所以红黑树在最坏的复杂度下有更好的表现
-
二叉搜索树是有序的,可以给用户的按序遍历带来良好的性能
-
二叉搜索树不需要散列函数
初始化
idr的定义:include/linux/idr.h 59行
1
2
3
4
5
6
7
|
struct idr {
  struct idr_layer *top;
  struct idr_layer *id_free;
  int    layers; */\* only valid without concurrent changes \*/*
  int    id_free_cnt;
  spinlock_t   lock;
};
|
初始化函数:lib/idr.c 680行
 1
 2
 3
 4
 5
 6
 7
 8
 9
10
11
12
|
*/***
 ** idr_init - initialize idr handle*
 ** @idp:   idr handle*
 ***
 *** *This function is use to* *set* *up the* *handle* *(@idp)* *that you will pass*
 ** to the rest of the functions.*
 **/*
void idr_init(struct idr **idp*)
{
  memset(idp, 0, sizeof(struct idr));
  spin_lock_init(&idp->lock);
}
|
调用了一下 memset函数,把对应空间置零,然后初始化了其中的 lock .
分配UID
建立 idr 后,就可以分配新的 UID 了.
-
告诉idr需要分配新的UID,允许其在必要时调整后备树大小
-
请求真正的新的UID
lib/idr.c 108行 调整后备树的大小
 1
 2
 3
 4
 5
 6
 7
 8
 9
10
11
12
13
14
15
16
17
18
19
20
21
22
23
|
*/***
 ** idr_pre_get - reserver resources* *for* *idr allocation*
 ** @idp:   idr handle*
 ** @gfp_mask:  memory allocation flags*
 ***
 ** This function should be called prior to locking* *and* *calling the*
 ** idr_get_new\* functions. It preallocates enough memory to satisfy*
 ** the worst possible allocation.*
 ***
 ** If the system is REALLY out of memory* *this* *function returns* *0**,*
 ** otherwise* *1.*
 **/*
int idr_pre_get(struct idr **idp*, gfp_t *gfp_mask*)
{
  while (idp->id_free_cnt < IDR_FREE_MAX) {
    struct idr_layer *new;
    new = kmem_cache_zalloc(idr_layer_cache, gfp_mask);
    if (new == NULL)
      return (0);
    move_to_free_list(idp, new);
  }
  return 1;
}
|
从源码可以看出,调整由 idp 指向 idr 的大小,如果真的需要调整大小,内存分配例程使用 gfp 标识:gfp_mask
lib/idr.c 315行 实际执行获取新的UID
 1
 2
 3
 4
 5
 6
 7
 8
 9
10
11
12
13
14
15
16
17
18
19
20
21
22
23
24
25
26
27
28
|
*/***
 ** idr_get_new - allocate* *new* *idr entry*
 *** *@idp**: idr handle*
 *** *@ptr**: pointer you want associated with the id*
 *** *@id**: pointer to the allocated handle*
 ***
 ** This is the allocate id function.  It should be called with any*
 ** required locks.*
 ***
 ** If memory is required, it will* *return* *-EAGAIN, you should unlock*
 *** *and go back to the* *idr_pre_get**()* *call.  If the idr is full, it will*
 *** *return* *-ENOSPC.*
 ***
 *** *@id* *returns a value in the range* *0* *...* *0x7fffffff*
 **/*
int idr_get_new(struct idr **idp*, void **ptr*, int **id*)
{
  int rv;
  rv = idr_get_new_above_int(idp, ptr, 0);
  */**
   ** This is a cheap hack until the IDR code can be fixed to*
   *** *return* *proper error values.*
   **/*
  if (rv < 0)
    return _idr_rc_to_errno(rv);
  *id = rv;
  return 0;
}
|
该方法使用 idp 指向的 idr 分配一个新的 UID ,并且将其关联到指针 ptr 上。成功时,该方法返回0,并且将新的 UID 存于 id.
查找UID
lib/idr.c 490行
 1
 2
 3
 4
 5
 6
 7
 8
 9
10
11
12
13
14
15
16
17
18
19
20
21
22
23
24
25
26
27
28
29
30
31
32
|
*/***
 ** idr_find -* *return* *pointer* *for* *given id*
 ** @idp: idr handle*
 ** @id: lookup key*
 ***
 ** Return the pointer given the id it has been registered with.  A %**NULL*
 *** *return* *indicates that @id is* *not* *valid* *or* *you passed %**NULL* *in*
 ** idr_get_new().*
 ***
 *** *This function can be called under* *rcu_read_lock**()**, given that the leaf*
 ** pointers lifetimes are correctly managed.*
 **/*
void *idr_find(struct idr **idp*, int *id*)
{
  int n;
  struct idr_layer *p;
  p = rcu_dereference_raw(idp->top);
  if (!p)
    return NULL;
  n = (p->layer+1) * IDR_BITS;
  */\* Mask off upper bits we don't use for the search. \*/*
  id &= MAX_ID_MASK;
  if (id >= (1 << n))
    return NULL;
  BUG_ON(n == 0);
  while (n > 0 && p) {
    n -= IDR_BITS;
    BUG_ON(n != p->layer*IDR_BITS);
    p = rcu_dereference_raw(p->ary[(id >> n) & IDR_MASK]);
  }
  return((void *)p);
}
|
如果调用成功,则返回id关联的指针,如果错误则返回空指针
删除UID
lib/idr.c 390行
 1
 2
 3
 4
 5
 6
 7
 8
 9
10
11
12
13
14
15
16
17
18
19
20
21
22
23
24
25
26
27
28
29
30
31
32
33
34
35
36
37
38
|
*/***
 ** idr_remove - remove the given id* *and* *free it**'s slot*
 ** @idp: idr handle*
 ** @id: unique key*
 **/*
void idr_remove(struct idr **idp*, int *id*)
{
  struct idr_layer *p;
  struct idr_layer *to_free;
  */\* Mask off upper bits we don't use for the search. \*/*
  id &= MAX_ID_MASK;
  sub_remove(idp, (idp->layers - 1) * IDR_BITS, id);
  if (idp->top && idp->top->count == 1 && (idp->layers > 1) &&
    idp->top->ary[0]) {
    */**
     ** Single child at leftmost slot: we can shrink the tree.*
     ** This level is not needed anymore since when layers are*
     ** inserted, they are inserted at the top of the existing*
     ** tree.*
     **/*
    to_free = idp->top;
    p = idp->top->ary[0];
    rcu_assign_pointer(idp->top, p);
    --idp->layers;
    to_free->bitmap = to_free->count = 0;
    free_layer(to_free);
  }
  while (idp->id_free_cnt >= IDR_FREE_MAX) {
    p = get_from_free_list(idp);
    */**
     ** Note: we don**'t call the rcu callback here, since the only*
     ** layers that fall into the freelist are those that have been*
     ** preallocated.*
     **/*
    kmem_cache_free(idr_layer_cache, p);
  }
  return;
}
|
如果删除成功,会将id关联的指针一起从映射中删除。但是,这个函数没有办法提示任何错误。
撤销 idr
lib/idr.c 477行
 1
 2
 3
 4
 5
 6
 7
 8
 9
10
11
|
*/***
 ** idr_destroy - release all cached layers within an idr tree*
 ** idp: idr handle*
 **/*
void idr_destroy(struct idr **idp*)
{
  while (idp->id_free_cnt) {
    struct idr_layer *p = get_from_free_list(idp);
    kmem_cache_free(idr_layer_cache, p);
  }
}
|
这个源码很好懂,通过循环,直接释放idr中未使用的内存。但是它并不释放当前分配给UID使用的任何内存。通常来说,内核代码不会撤销 idr
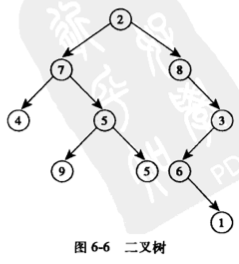
二叉树
树是一个有向无环图(DAG)图,二叉树是每个节点最多只有两个出边以及0或1个入边的树。
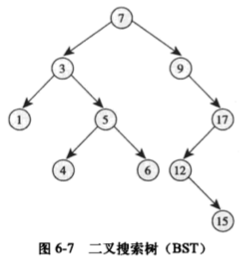
二叉树搜索树(BST)
遵循以下规则:
-
一个节点的左儿子小于这个节点的值
-
这个节点的右儿子大于这个节点的值
-
其所有的子树也是二叉搜索树
平衡二叉树
平衡二叉树递归定义如下:
-
左右子树的高度差小于等于 1。
-
其每一个子树均为平衡二叉树。
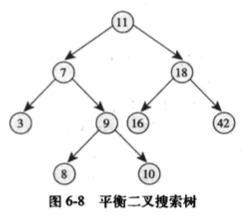
平衡二叉搜索树
-
必须是一棵二叉树
-
必须是一棵二叉搜索树
-
要满足平衡的特性
定义:
-
深度:从根节点起,到达他一共经过的父节点数目。
-
叶子节点:树的最底层节点(没有儿子)
-
树的高度:树中处于最底层节点的数目
平衡二叉搜索树(英语:Balanced Binary Search Tree)是一种结构平衡的二叉搜索树,它是一种每个节点的左右两子树高度差都不超过一的二叉树。它能在O(logn)内完成插入、查找和删除操作,最早被发明的平衡二叉搜索树为AVL树。
自平衡二叉搜索树
定义:在保证是一棵二叉搜索树的前提下,要保证自平衡
AVL树
虽然书上没有AVL,但是还是拿出来说一下。
基本定义
为了保证平衡的特性,AVL 树引入了所谓监督机制,就是在树的某一部分的不平衡度超过一个阈值后触发相应的平衡操作。保证树的平衡度在可以接受的范围内。
定义:
所以当插入新节点时,层数会增加导致AVL的性质被破坏,这时就需要进行一些操作,来使树具有AVL性质。最多旋转的次数是二叉树的层数,所以时间复杂度是 O(nlogn)
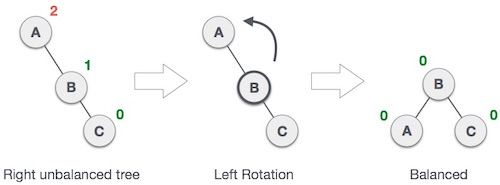
具体实现
二叉树的平衡化有两大基础操作: 左旋和右旋。左旋,即是逆时针旋转;右旋,即是顺时针旋转。这种旋转在整个平衡化过程中可能进行一次或多次,这两种操作都是从失去平衡的最小子树根结点开始的(即离插入结点最近且平衡因子超过1的祖结点)。
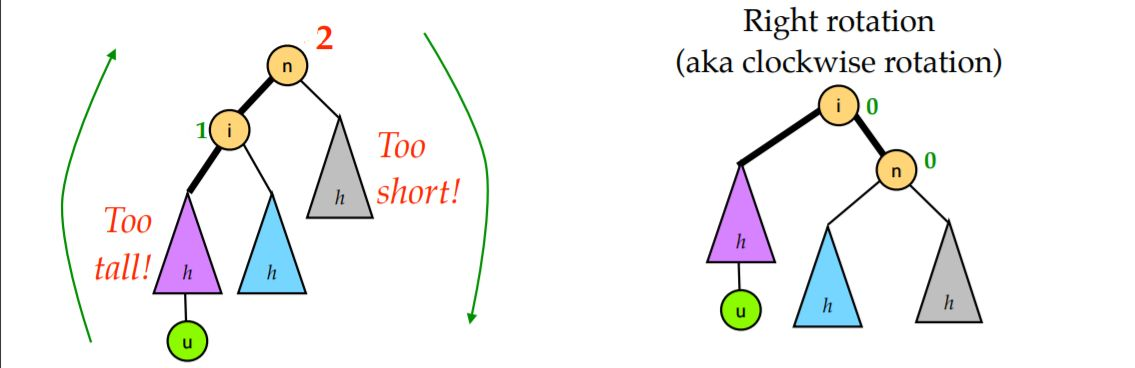
右旋操作:

所谓右旋操作,就是把上图中的 B 节点和 C 节点进行所谓“父子交换”。在仅有这三个节点时候,是十分简单的。但是当 B 节点处存在右孩子时,事情就变得有点复杂了。我们通常的操作是:抛弃右孩子,将之和旋转后的节点 C 相连,成为节点 C 的左孩子。
左旋操作
左旋操作和右旋操作十分类似,唯一不同的就是需要将左右呼唤下。我们可以认为这两种操作是对称的
需要平衡的四种情况
LL型

所谓 LL 型就是上图左边那种情况,即因为在根节点的左孩子的左子树添加了新节点,导致根节点的平衡因子变为 +2,二叉树失去平衡。对于这种情况,对节点 n 右旋一次即可。
RR型
|
RR 型的情况和 LL 型完全对称。只需要对节点 n 进行一次左旋即可修正。
LR型
|
LR 就是将新的节点插入到了 n 的左孩子的右子树上导致的不平衡的情况。这时我们需要的是先对 i 进行一次左旋再对 n 进行一次右旋。
RL型
RL 就是将新的节点插入到了 n 的右孩子的左子树上导致的不平衡的情况。这时我们需要的是先对 i 进行一次右旋再对 n 进行一次左旋。
这四种情况的判断很简单。我们根据破坏树的平衡性(平衡因子的绝对值大于 1)的节点以及其子节点的平衡因子来判断平衡化类型。
插入
插入成功后,在递归回溯时依次对经过的结点判断是否失衡,若失衡就需要对其进行对应的旋转操作使其恢复平衡,在这期间,原先作为一棵子树的根结点就会因为旋转被替换
删除
删除操作的四种失衡情况和插入操作一样
红黑树
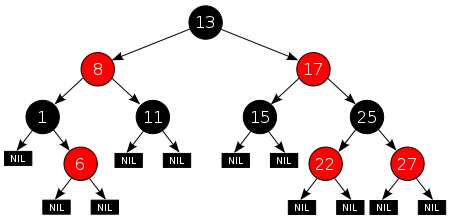
红黑树(英语:Red–black tree)是一种自平衡二叉查找树,是在计算机科学中用到的一种数据结构,典型的用途是实现关联数组。它在1972年由鲁道夫·贝尔发明,被称为"对称二叉B树",它现代的名字源于Leo J. Guibas和Robert Sedgewick于1978年写的一篇论文。红黑树的结构复杂,但它的操作有着良好的最坏情况运行时间,并且在实践中高效:它可以在O(logn)时间内完成查找、插入和删除,这里的n是树中元素的数目
性质
-
每个节点要么是红的,要么是黑的
-
根节点时黑色的
-
所有的叶子节点都是黑色的(叶子节点是NIL节点)
-
如果一个节点是红色的,则它的两个儿子都是黑色的(从每个叶子到根的所有路径上不能有两个连续的红色节点。)
-
从任一节点到其每个叶子的所有简单路径都包含相同数目的黑色节点。
|
这些约束确保了红黑树的关键特性:
从根到叶子的最长的可能路径不多于最短的可能路径的两倍长。结果是这个树大致上是平衡的。
因为操作比如插入、删除和查找某个值的最坏情况时间都要求与树的高度成比例,这个在高度上的理论上限允许红黑树在最坏情况下都是高效的,而不同于普通的二叉查找树。
要知道为什么这些性质确保了这个结果,注意到性质4导致了路径不能有两个相连的红色节点就足够了。最短的可能路径都是黑色节点,最长的可能路径有交替的红色和黑色节点。因为根据性质5所有最长的路径都有相同数目的黑色节点,这就表明了没有路径能多于任何其他路径的两倍长。
在很多树数据结构的表示中,一个节点有可能只有一个子节点,而叶子节点包含数据。用这种范例表示红黑树是可能的,但是这会改变一些性质并使算法复杂。为此,本文中我们使用"nil叶子"或"空(null)叶子",如上图所示,它不包含数据而只充当树在此结束的指示。这些节点在绘图中经常被省略,导致了这些树好像同上述原则相矛盾,而实际上不是这样。与此有关的结论是所有节点都有两个子节点,尽管其中的一个或两个可能是空叶子。
旋转
红黑树也是一个特化的二叉查找树,所以只读操作和普通而二叉查找树相同。
但是插入或删除会导致不符合红黑树性质,所以需要O(logn)的颜色变更(每个节点不超过三次旋转)
对于重新着色,并不困难。可以看一下「旋转」方式:
左旋
|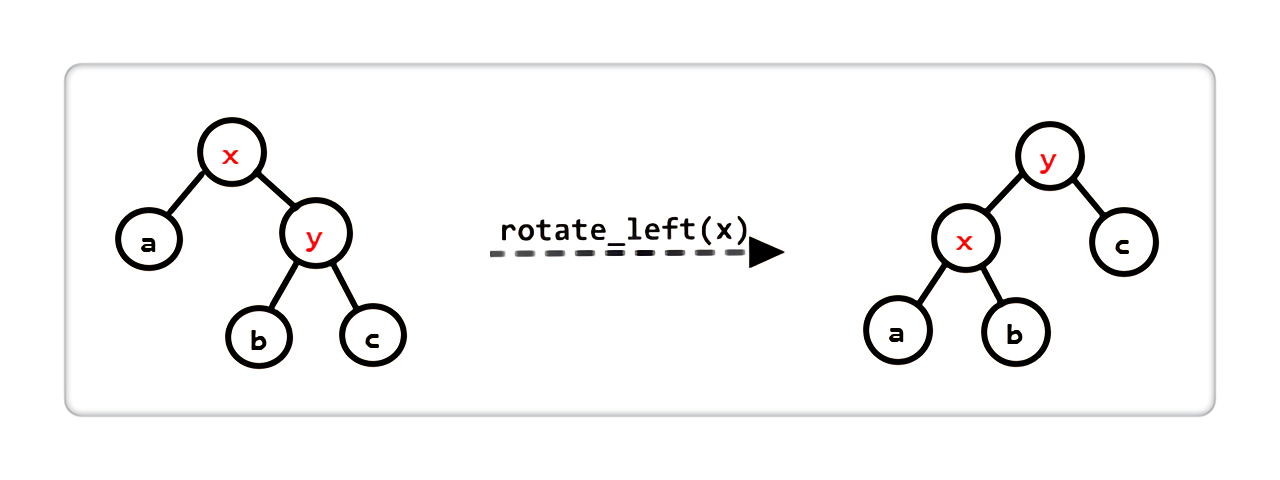
x变成y的左儿子,x的右儿子变成y的左儿子
右旋
|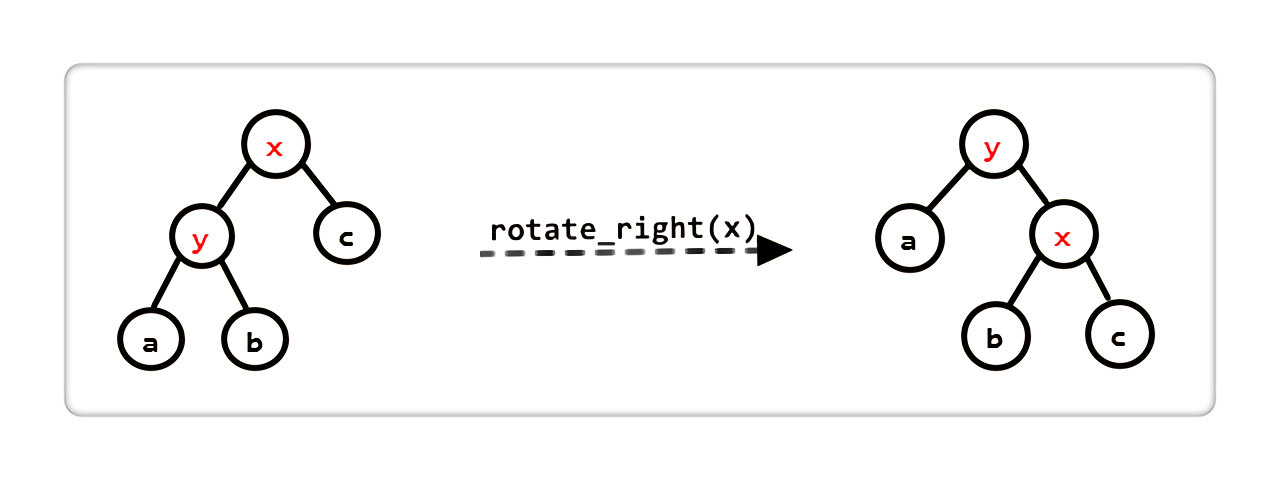
x变成y的右儿子,x的左儿子变成y的右儿子
插入
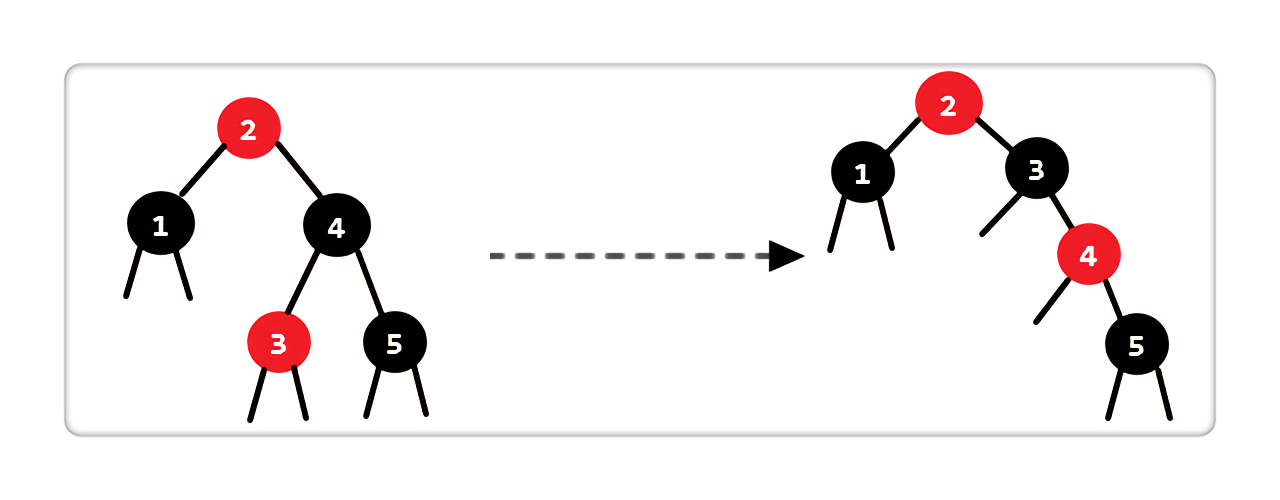
将红黑树当作一颗二叉查找树,将结点插入,插入后,该树仍然是一棵二叉查找树,但是它可能已经不是红黑树了,所以接下来就要通过 “旋转” 和 “重新着色” 来使它重新成为红黑树。
- 把插入的新节点的颜色变成红色
如果设为黑色,就会导致根到叶子的路径上有一条路上,多一个额外的黑节点,这个是很难调整的。但是设为红色节点后,可能会导致出现两个连续红色节点的冲突,那么可以通过颜色调换和树旋转来调整。
-
插入的节点一共会有以下三种情况:
-
- 被插入结点是根结点,那我们把此结点涂为黑色就行了;
-
- 被插入结点的父亲结点是黑色的,那么什么也不需要做,结点被插入后,仍然是红黑树。
-
- 被插入结点的父亲结点是红色的,那么此时是违背 “性质 3” 的,需要调整。
调整方案:
此种情况,被插入的节点一定存在祖父节点(爸爸的爸爸),可以划分为六种情况,由于涉及镜像操作,可以分成三种:
- Case 1 :当前结点的父亲是红色,叔叔存在且也是红色
|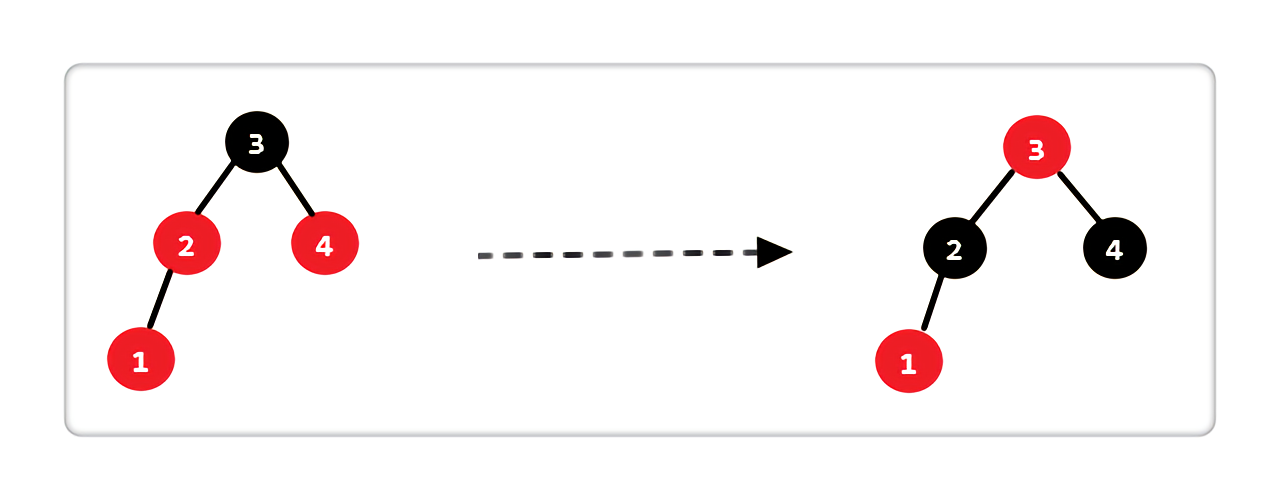
处理完后,图中显示的两条路径上,黑色结点数相同且和原图数目一致。
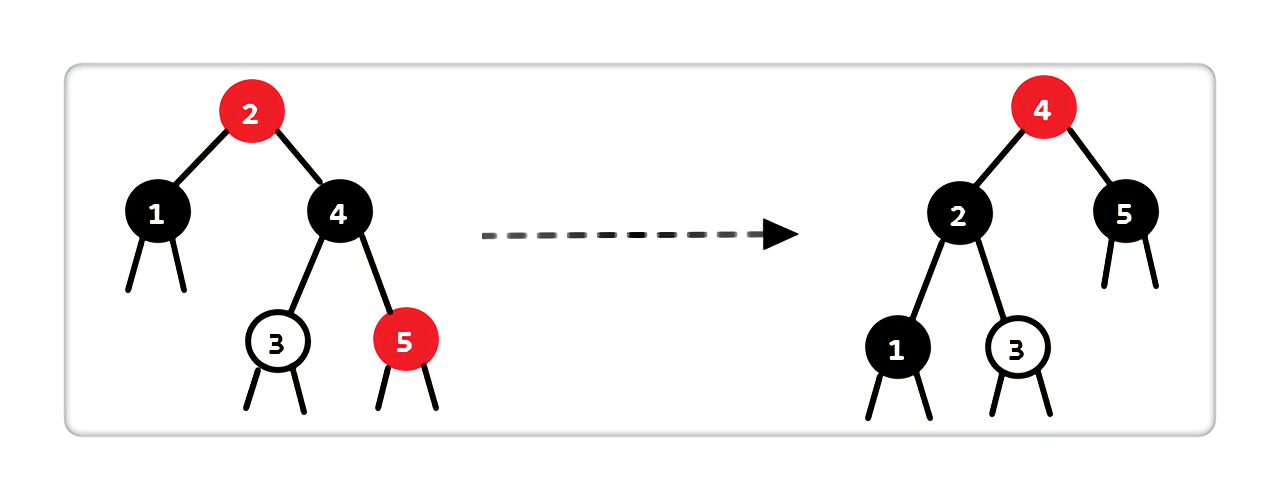
- Case 2:当前结点的父亲是红色,叔叔不存在或是黑色,且当前结点是其父亲的右孩子
|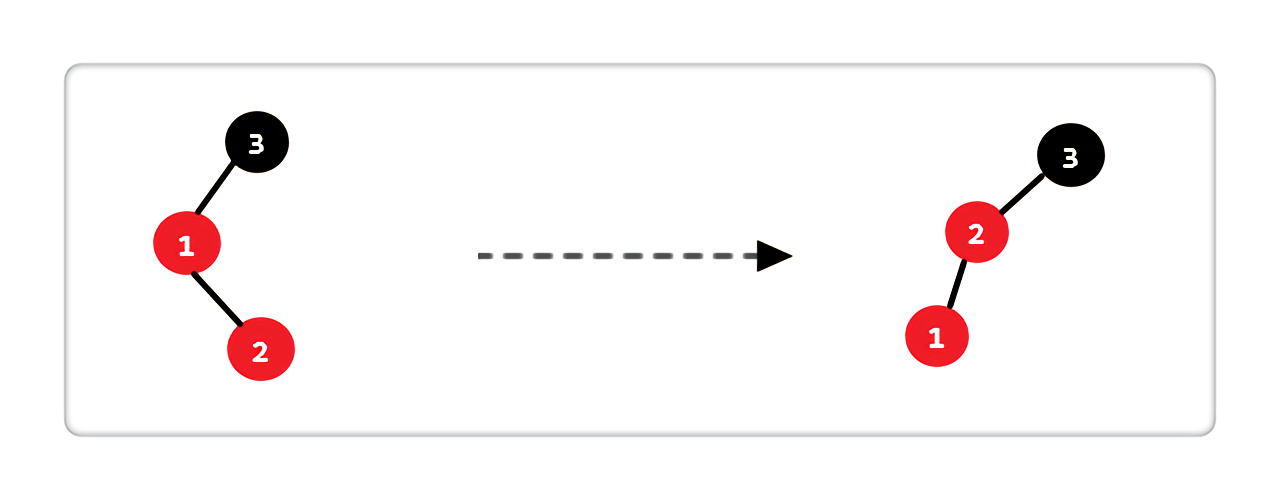
处理完上述操作之后,仍然发现不满足红黑树的性质,这就是下一条 Case
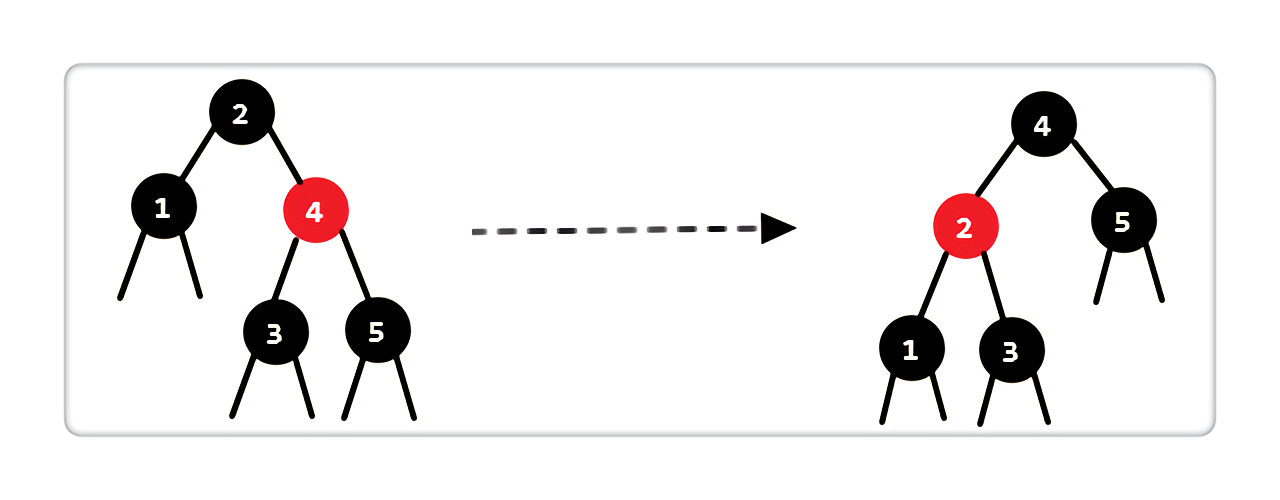
- Case 3:当前结点的父亲是红色,叔叔不存在或是黑色,且当前结点是其父亲的左孩子
|
处理完后,图中显示的两条路径上,黑色结点数相同且和原图数目一致。
删除
首先,和删除一棵普通二叉查找树的结点相同,我们会遇到三种情况:
-
“被删结点” 没有孩子,如果它是红色的,那么可以直接删除;
-
“被删结点” 只有一个孩子,那么删除该结点后,用这个孩子去替换它即可;
-
“被删结点” 有两个孩子,那么先找出它的 “后继结点”,然后用 “后继结点” 去替换 “被删结点”,把问题转化为删除 “后继结点” ,也就是说, “后继结点” 才是真正的 “被删结点”。
接着,我们来看看 “原先结点” 被删掉后,会遇到哪几种情况,分析发现,一共有四种:
-
“原先结点” 为黑色,“当前结点” 为红色,那么我们把 “原先结点” 删掉后,拿 “当前结点” 去替换它,并修改颜色为黑色即可;
-
“原先结点” 为黑色,“当前结点” 为黑色,这种情况比较复杂
-
“原先结点” 为红色,“当前结点” 为红色,那么我们把 “原先结点” 删掉后,直接拿"当前结点" 去替换它即可;
-
“原先结点” 为红色,“当前结点” 为黑色,这和 “情况 3” 一样,直接拿"当前结点" 去替换它即可。
最后,对于上述的 “情况 2”。这种情况可以进一步再划分为 8 种情况,因为涉及到镜像操作,所以我们只需理解其中一边镜像的 4 种情况即可(注意,下面的图片上,“原先结点” 已被删除,故未画出,只画出了 “当前结点” ):
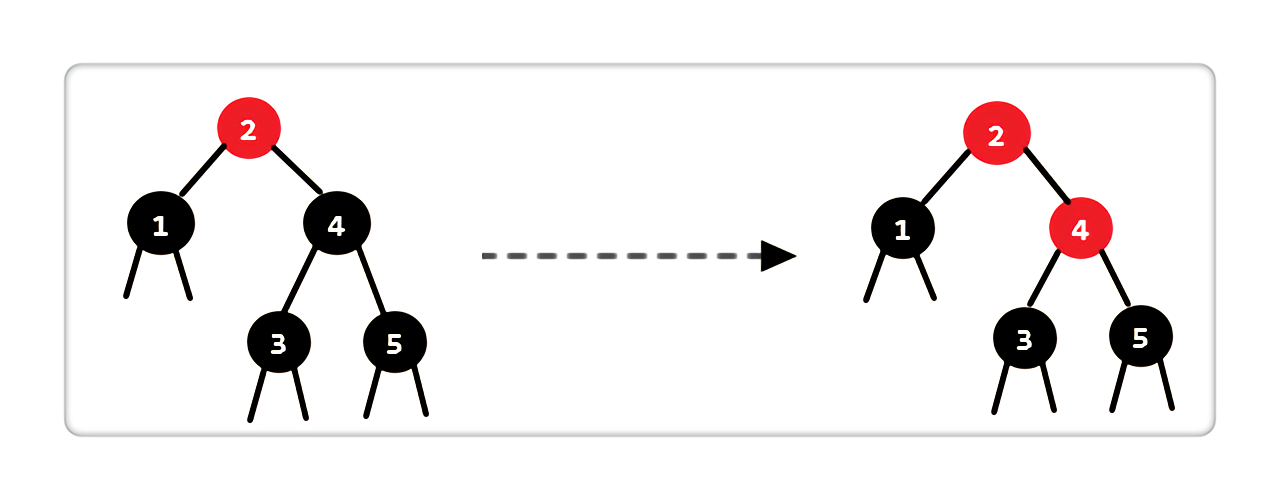
Case 1:当前结点是黑色,兄弟结点是红色
|
处理完后,我们发现依旧有 2 个黑色结点,说明当前状态并不满足红黑树性质。其实,这是进入了下面的 Case 2,Case 3,和 Case 4 阶段了。
Case 2:当前结点是黑色,兄弟结点是黑色,两个孩子为空或是黑色
|
处理完后,我们发现当前状态不满足红黑树性质,但是我们发现只要把 “结点 2” 着色为黑色不就行了么。
Case 3:当前结点是黑色,兄弟结点是黑色,兄弟结点的左孩子是红色,右孩子为空或是黑色
|
处理完后,我们发现图中2->1上还是只有 1 个黑色结点,说明当前状态不满足红黑树性质。其实这是进入了Case 4
Case 4:当前结点是黑色,兄弟结点是黑色,兄弟结点的右孩子是红色,左孩子为空或红黑皆可
|
比较
-
对于 AVL 树,在插入或删除操作后,都要利用递归的回溯,去维护从被删结点到根结点这条路径上的所有结点的平衡性,回溯的量级是需要 O(logn) 的,其中插入操作最多需要两次旋转,删除操作可能是 1 次、2 次或 2 次以上。而红黑树在 插入的时候最多需要 2 次旋转,在 rebalance 的时候最多也只需要 3 次旋转。
-
其次,AVL 树的结构相较红黑树来说更为平衡,故在插入和删除结点时更容易引起不平衡。因此在大量数据需要插入或者删除时,AVL 树需要 rebalance 的频率会更高,相比之下,红黑树的效率会更高。
内核中的实现
内核中的实现,定义在 include/linux/rbtree.h 中,实现在 lib/rbtree.c 。
节点定义
include/linux/rbtree.h 100行
 1
 2
 3
 4
 5
 6
 7
 8
 9
10
11
12
13
|
struct rb_node
{
  unsigned long  rb_parent_color;
#define RB_RED    0
#define RB_BLACK   1
  struct rb_node *rb_right;
  struct rb_node *rb_left;
} __attribute__((aligned(sizeof(long))));
  */\* The alignment might seem pointless, but allegedly CRIS needs it \*/*
struct rb_root
{
  struct rb_node *rb_node;
};
|
根节点由 rb_root 定义,给定一个 rb_node 。可以通过跟踪同名节点指针来找到他的左右子节点。
1
2
|
// include/linux/rbtree.h 133行 通过指针寻找这个结构的地址
#define rb_entry(*ptr*, *type*, *member*) container_of(ptr, type, member)
|
操作
引用一段代码注释:
 1
 2
 3
 4
 5
 6
 7
 8
 9
10
11
|
 *linux/include/linux/rbtree.h*
 *To* *use* *rbtrees you**'ll have to implement your own insert and search cores.*
 *This will avoid us to* *use* *callbacks* *and* *to* *drop* *drammatically performances.*
 *I know it's not the cleaner way,  but in C (not in C++) to get*
 *performances and genericity...*
 *Some example of* *insert* *and* *search* *follows* *here. The* *search* *is* *a plain*
 *normal search over an ordered tree. The* *insert* *instead must be implemented*
 *in two steps: First, the code must* *insert* *the* *element* *in* *order* *as* *a red leaf*
 *in the tree, and then the support library function rb_insert_color() must*
 *be called. Such function will* *do* *the* *not* *trivial* *work* *to* *rebalance the*
 *rbtree, if necessary.*
|
Rbtree 中并没有提供搜索和插入例程,这些历程希望由 rbtree 的用户自己定义。这是因为C语言不太容易进行泛型编程。
源码中也提供了使用内核中红黑树的例程:
include/linux/rbtree.h 34行
 1
 2
 3
 4
 5
 6
 7
 8
 9
10
11
12
13
14
15
16
17
|
*static* *inline* *struct page ** *rb_search_page_cache**(struct inode \* inode,*
             *unsigned* *long* *offset)*
*{*
  *struct* *rb_node* *** *n* *=* *inode**->**i_rb_page_cache**.**rb_node**;*
  *struct* *page* *** *page**;*
  *while* *(n)*
  *{*
    *page = rb_entry(n, struct page, rb_page_cache);*
    *if* *(offset < page->offset)*
      *n = n->rb_left;*
    *else* *if* *(offset > page->offset)*
      *n = n->rb_right;*
    *else*
      *return* *page;*
  *}*
  *return* *NULL**;*
*}*
|
上面的例子实现了,在页高速缓存中搜索一个文件区(由一个i节点和一个偏移量共同描述)。每个节点都有自己的 rbtree ,该函数将搜索给定节点i的rbtree,以寻找匹配的偏移值
 1
 2
 3
 4
 5
 6
 7
 8
 9
10
11
12
13
14
15
16
17
18
19
20
21
22
23
24
25
26
27
28
29
30
31
32
|
*static* *inline* *struct* *page* ** __**rb_insert_page_cache**(**struct* *inode* *** *inode**,*
              *unsigned* *long* *offset,*
              *struct* *rb_node* *** *node**)*
*{*
  *struct* *rb_node* **** *p* *= &**inode**->**i_rb_page_cache**.**rb_node**;*
  *struct* *rb_node* *** *parent* *=* *NULL**;*
  *struct* *page* *** *page**;*
  *while* *(\*p)*
  *{*
    *parent = \*p;*
    *page = rb_entry(parent, struct page, rb_page_cache);*
    *if* *(offset < page->offset)*
      *p = &(\*p)->rb_left;*
    *else* *if* *(offset > page->offset)*
      *p = &(\*p)->rb_right;*
    *else*
      *return* *page;*
  *}*
  *rb_link_node(node, parent, p);*
  *return* *NULL**;*
*}*
*static* *inline* *struct page ** *rb_insert_page_cache**(struct inode \* inode,*
             *unsigned* *long* *offset,*
             *struct* *rb_node* *** *node**)*
*{*
  *struct* *page* *** *ret**;*
  *if* *((ret = __rb_insert_page_cache(inode, offset, node)))*
    *goto* *out;*
  *rb_insert_color(node, &inode->i_rb_page_cache);*
 *out:*
  *return* *ret;*
*}*
|
插入操作根据 offset选择插入方向,函数希望找不到匹配的offset,因为他想要找到的是新 offset 要插入的叶子节点,然后用 rb_link_node() 在给定位置插入新节点,插入之后再调用函数进行复杂的红黑树平衡过程,如果页被加入成功,则返回NULL,否则返回已经存在的页地址
数据结构的选择
-
如果对数据集合的主要操作是遍历数据,那就使用链表。
-
如果代码符合 生产者/消费者模式,就使用队列
-
如果需要映射一个 UID 到一个对象,那就使用映射。
-
如果需要存储大量数据吗,并且需要检索快速,就用红黑树。插入删除复杂度都是O(logn)的
思考
- 内核中不是把将数据结构塞入链表,而是将链表节点塞入数据结构,这是为什么?
答:一条链表可以串联起多个不同对象,比较灵活
- AVL树也是平衡二叉搜索树,为什么选用了红黑树而不是AVL?
答:Documentation/rbtree.txt中第16行提到:红黑树类似于AVL树,但提供更快的实时性插入和删除的有界最坏情况性能(最多两个分别旋转和三次旋转以平衡树)。查找时间稍慢(但仍为O(log n))。
红黑树丧失了部分平衡性,来保证旋转的次数,总体来说,性能更好
其他
内核的文件目录中,有中文文档,大家可以参考一下:
https://github.com/torvalds/linux/tree/master/Documentation/translations/zh_CN/process
比如,这里有内核规定的代码风格中文版:https://github.com/torvalds/linux/blob/master/Documentation/translations/zh_CN/process/coding-style.rst
参考资料
-
Linux内核链表——看这一篇文章就够了
-
维基百科:红黑树
最后修改于 2020-08-28

本作品采用
知识共享署名-非商业性使用-相同方式共享 4.0 国际许可协议进行许可。